Using KeepassXC Productively
I already wrote about that everybody should get a Password Manager
The one that I’m using is KeepassXC.
It has many cool features:
- It’s offline and stores your credentials in encrypted database file.
- It’s Auto-Type Feature to automatically enter your credentials
- Support for Multi Factor Authentication
- It’s Android App supports Fingerprint unlocking.
- It can generate strong passwords in many ways
- It can be used as an SSH Key Agent
But my favorite one is being able to Auto-Type Credentials using a virtual keyboard.
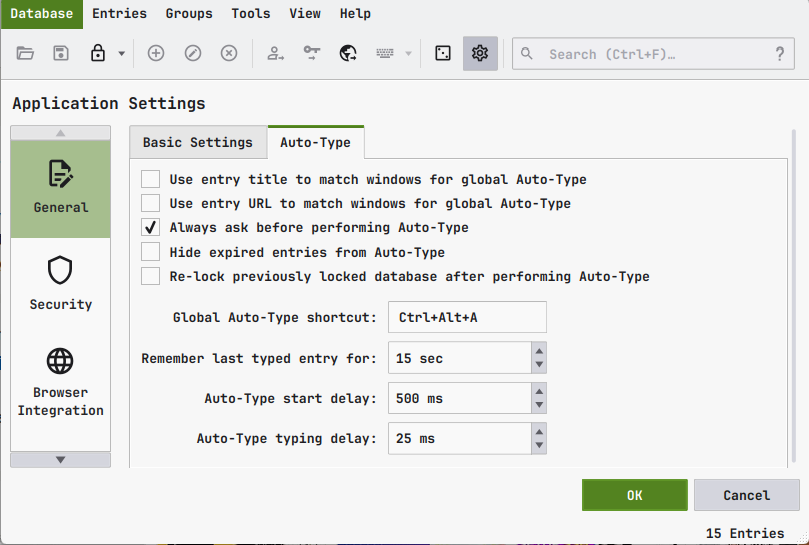
Auto Typing
With Auto-Type, you can automatically type in credentials anywhere on your desktop. Similar to other Browser based Password Managers, but not restricted to your browser.
Auto Type
Using a Global Shortcut, a modal window pops up that allows you to select the entry to type in.
You can set it in Settings → Auto-Type. I set mine to Ctrl+Alt+A.
Now if you use the global shortcut, the modal shows you all entries with the option to search for the right one.
If KeepassXC finds a match for the currently selected window, it prefilters the modal for you.
By default, it uses the title of the window. Like the URL from your open browser tab. I disabled this in the settings and also set always ask before perming Auto-Type.
Creating a New KeepassXC Entry
You can customize the typing sequence for all entries.
Either for all matches or only given a certain window title.
Here I enabled Autotyping only Figma’s login page.
Additionally, I have a Firefox plugin which appends the full URL to the browser title.
I cut off the end part (was “Mozilla Firefox”) and used the * wildcard to include other browsers.
And I modified the sequence to clear the input field and use a Tab character to select the next input field.
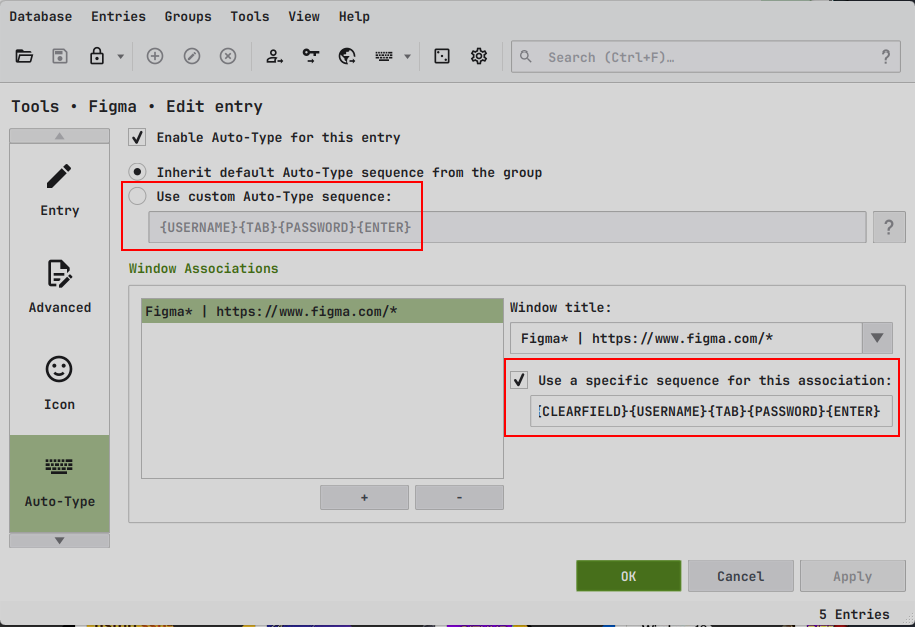
Now if I use the Auto Type Global shortcut when the Figma Login Site is selected, it will only show me this entry, and I just need to hit enter to type the sequence.
Two Key presses in total.
Hidden Auto Type Search Modal Features
Some login screens are a bit more complicated, and annoying.
Office365 for example. It has three different screens.
- One to enter your username, following a delay
- The next one to enter your password, following a delay
- And finally, one to enter your MFA Token
All having the same URL.
Creating a single big sequence does not work, as sometimes it remembers your account and shows you the second screen right away.
Ok, no problem, just create 3 Auto-Type entries and customize their sequences for each of your Office365 Accounts (I have multiple).
Problem is that you cannot search for “Password” or “TOTP” in the Auto-Type window.
However, there is a hidden feature in the Auto-Type window.
If you filter out your correct entry, you can
- use
CTRL+1to only enter the username - use
CTRL+2to only enter the password - and
CTRL+3to only enter the TOTP field
So this means that whichever screen is presented, I use my trusty old global short cut, and enter the correct field using the second shortcut.
Tip: Auto Complete Secrets in Your Shell
Apart from the browser, Auto-typing proves useful in the shell too.
Imagine this: Your app uses Postgres as a Database.
Being a good developer, you use separate sets of credentials for each environment: Staging, QA and Production
You store them in your Keepass. All good.
However sometimes you need to connect to the database manually.
You can do this with the psql command.
# connect to postgres database
psql --host=${HOST} --port=${PORT} --username=${USER} --dbname=${PW}
Now the time has come to do some manual labour. You whip out your shell and try to remember the cryptic long hostnames let alone the passwords for DEV. Thankfully you have it all in your Password Manager.
Now you could open Keepass, search for the DEV Postgres Credentials, open the entry, and then copy over the hostname, username and finally the password.
Or you could use the trick from above,
- activate the Auto-type popup window,
- search for your entry,
- and use
CTRL+1to input host, - and
CTRL+2to input the password.
I also use this frequently to complete other things I can’t remember.